이번 포스팅엔 Kubernetes에 Custom Resource를 사용하는 방법에 대해서 살펴보도록 하겠습니다. Custom resource를 정의하고 사용하기 위해선 기반 지식이 조금 필요한데요. 이전의 포스팅에서 조금씩 언급한 부분이지만 시간이 지나고 나니 저의 설명이 너무 부실....^^한 포스팅이 많은 것 같아서 관련된 부분들을 조금씩 다시 언급하며 포스팅을 진행하도록 하겠습니다.
Custom Resource를 사용하기 위해서 알아야 하는 가장 중요한 지식이 있는데 바로 Object와 Controller입니다.
Object
Kubernetes에서 관리하는 리소스를 말합니다. 여기서 리소스란 Container, Network Config, Storage Config 등이 있습니다.
예를 들어 noah-deploy라는 deployment가 kubernetes 환경에 배포되어 있을 경우 배포된 yaml 파일을 조회해보면 아래와 같은 결과를 확인하실 수 있습니다.
$ kubectl get deploy noah-deploy -o yaml

apiVersion: v1
kind: Deployment
metadata:
  name: noah-deploy
  namespace: default
  ...
spec:
  replicas: 3
  template:
  ...
    containers:
    - image: ooeunz/noah:0.0.1-SNAPSHOT
      imagePullPolicy: Always
      name: noah
status:
  ...
  readyReplicas: 3
  replicas: 3
주의 깊게 볼 부분은 metadata, spec, status입니다.
- metadata: 말 그대로 metadata입니다. Object의 name이나 namespace 같은 정보가 들어있습니다.
- spec: Object가 원하는 상태입니다. (Desired State)
- status: Object의 현재 상태입니다. (Current State)
Controller
위에서 확인한 Object의 Status(현재 상태)를 spec(정의한 스펙)과 일치하도록 제어하는 일을 합니다. 즉 예를 들어 기대한 spec의 replicas가 3인데 status의 값이 2라면 controller는 status를 spec에 일치시키기 위해 controller는 하나의 pod를 더 실행시키게 될 것입니다.
controller의 이러한 제어 과정을 Reconcile이라고 명칭합니다.
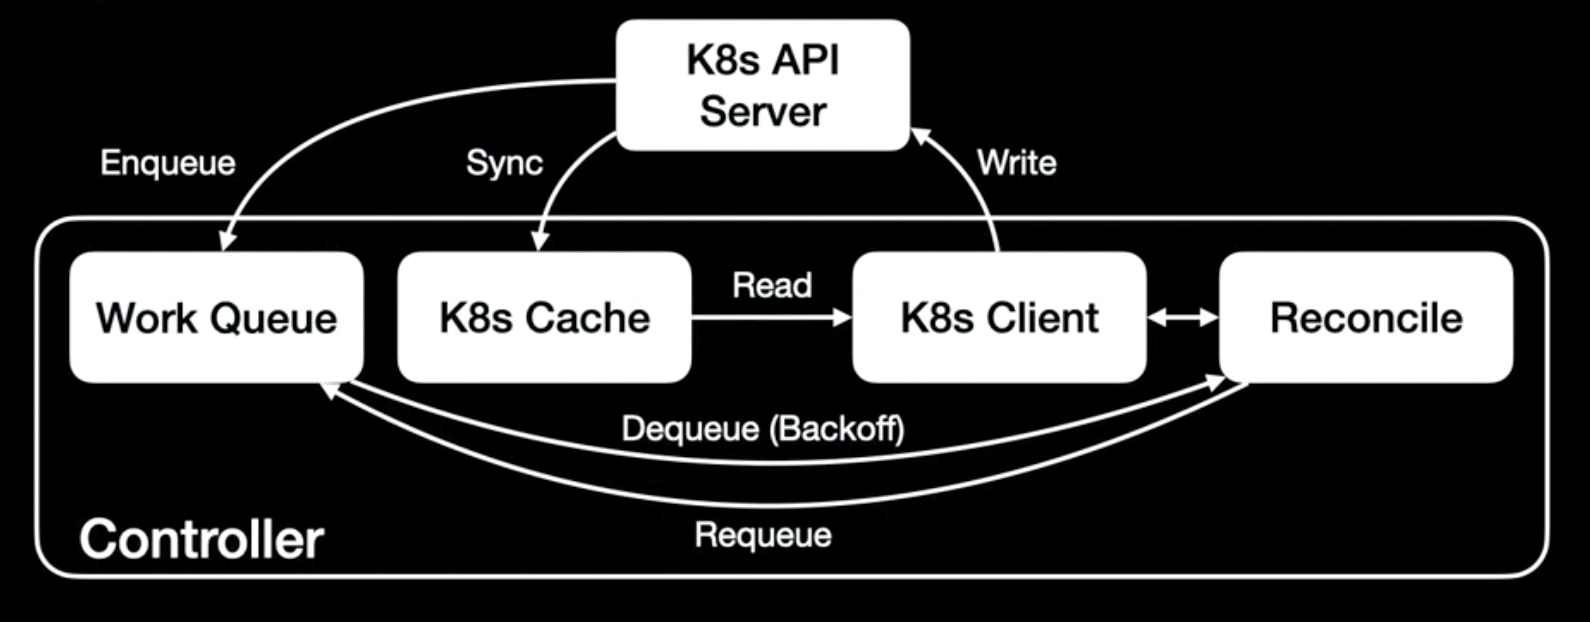
그렇다면 Controller는 내부적으로 어떤 식으로 동작하는지 좀 더 자세히 살펴보도록 하겠습니다.
K8S API Server
가장 위에 있는 K8S API Server는 아시다시피 사용자가 클러스터에 접근하기 위한 api를 제공하는 서버입니다. 그와 동시에 kubernetes의 모든 구성요소와 상호 작용하는 서버입니다. 만약 사용자로부터 Object 생성 요청을 받게 되면 api server는 object를 etcd 분산형 저장소에 저장하게 되고 Object Event를 컨트롤러에 전달하게 됩니다.
Work Queue
API Server로부터 spec 또는 status가 변경된 object의 식별 정보를 저장하는 queue입니다.
Reconcile
그림에 존재하는 reconciile은 실제론 reconcile을 수행하는 함수입니다. Controller는 reconcile을 실행하기 위해 spec 또는 status가 변경됐다는 object의 식별자를 필요로 합니다. 이 식별자는 controller 내부에 존재하는 work queue에서 가져오게 됩니다.
이때 reconcile을 성공하게 되면 work queue로부터 가져온 식별자를 제거하게 되지만, 만약 실패한다면 다시 수행하기 위해 식별자를 queue에 다시 적재합니다. 이러한 과정을 BackOff라고 부릅니다.
K8S (Read) Cache
Reconcile 함수는 reconcile을 수행하기 위해 k8s client를 사용하게 됩니다. 이때 k8s client는 API Server의 과부하를 방지하기 위해 controller 내부에 존재하는 cache로부터 데이터를 읽어오게 되는데요. 캐시를 사용하기 때문에 일시적으로 API Server와 cache 사이에 데이터 불일치가 발생할 수 있습니다. 하지만 이러한 문제는 계속해서 reconcile이 적용됨에 따라 api server와 cache 사이에 sync가 적용되며 자연스레 해소되게 됩니다.
Custom Controller
그렇다면 custom controller란 무엇일까요?
custom controller란 말 뜻에서도 유추할 수 있듯이 kubernetes 사용자가 개발한 컨트롤러입니다. custom controller를 사용하면 kubernetes 사용자가 원하는 대로 리소스를 선언형으로 관리할 수 있다는 장점이 있습니다.
여기서 선언형으로 관리한다는 것은 일단 한번 리소스를 선언하고 나면 이후부턴 controller가 리소스를 스스로 관리한다는 뜻입니다. 즉 장애가 발생하더라도 위에서 살펴본 reconcile로 인해 controller가 스스로 장애를 복구하며, 리소스 전체를 이해하지 않더라도 간단하게 spec을 변경함으로 컨트롤러가 알아서 변경 관리하도록 해서 유지보수의 이점까지 챙길 수 있습니다.
무엇을 만들지?
그럼 이번엔 직접 Kubernetes Controller를 만들어보도록 하겠습니다. Kubernetes에선 Controller를 만들기 위해 다양한 client library를 지원하고 있습니다. 대표적인 언어로는 Go, Python, Java, Javascript가 있으며 자세한 내용은 이곳에서 확인하실 수 있습니다. 특별히 이번 포스팅에서는 Java 클라이언트 라이브러리를 사용해보도록 하겠습니다.
fabric8io/kubernetes-client
Java client for Kubernetes & OpenShift . Contribute to fabric8io/kubernetes-client development by creating an account on GitHub.
github.com
이번 포스팅에서 만들 Custom Controller는 아래와 같은 CustomResource Foo에 대한 컨트롤러입니다.
apiVersion: samplecontroller.k8s.io/v1alpha1
kind: Foo
metadata:
  name: example-bar
spec:
  deploymentName: example-bar-deploy
  replicas: 1
위의 템플릿으로 정의된 Foo resource가 생성되면 우리가 지정한 이름과 원하는 replica의 수에 대한 정보를 담은 Deployment를 함께 생성하게 됩니다. 그리고 Foo resource의 spec을 변경하면 다른 Kubernetes resource처럼 child Deployment에 업데이트를 진행하게 됩니다.
Project Structure
Java project의 구조는 아래와 같습니다.
model/v1alpha1 package 아래에 있는 Foo.java, FooList.java, FooSpec.java, FooStatus.java 클래스들은 Foo CustomResource에서 사용할 모델 클래스입니다.
controller package 하위에 있는 MyController.java 클래스는 컨트롤러의 로직을 포함하는 클래스입니다.
마지막으로 MyControllerMain.java 클래스는 KubernetesClient를 초기화하고 MyController에게 제어권을 위임하는 이 프로젝트의 driver class입니다.
.
├── pom.xml
├── README.md
└── src
    ├── main
    │   ├── java
    │   │   └── io
    │   │       └── fabric8
    │   │           └── mycontroller
    │   │               ├── api
    │   │               │   └── model
    │   │               │       └── v1alpha1
    │   │               │           ├── Foo.java
    │   │               │           ├── FooList.java
    │   │               │           ├── FooSpec.java
    │   │               │           └── FooStatus.java
    │   │               ├── controller
    │   │               │   └── MyController.java
    │   │               └── MyControllerMain.java
    │   └── resources
    │       ├── crd.yaml
    │       ├── cr.yaml
    │       └── example-foo.yml
    └── test
        └── ...
먼저 Maven Project를 생성하고 아래와 같이 dependency를 추가하도록 합니다. 사용할 dependency로는 로깅에 사용할 slf4j-simple과 Fabric8 kubernetes-client를 사용하게 됩니다. 그리고 모든 dependency를 포함하여 실행 가능한 jar를 만들기 위해 maven-assembly-plugin도 함께 추가합니다.
<dependencies>
        <dependency>
            <groupId>io.fabric8</groupId>
            <artifactId>kubernetes-client</artifactId>
            <version>5.2.1</version>
        </dependency>
        <dependency>
            <groupId>org.slf4j</groupId>
            <artifactId>slf4j-simple</artifactId>
            <version>1.7.30</version>
        </dependency>
    </dependencies>

    <build>
        <plugins>
            <plugin>
                <groupId>org.apache.maven.plugins</groupId>
                <artifactId>maven-assembly-plugin</artifactId>
                <version>3.1.0</version>
                <executions>
                    <execution>
                        <phase>package</phase>
                        <goals>
                            <goal>single</goal>
                        </goals>
                        <configuration>
                            <archive>
                                <manifest>
                                    <mainClass>
                                        io.fabric8.mycontroller.MyControllerMain
                                    </mainClass>
                                </manifest>
                            </archive>
                            <descriptorRefs>
                                <descriptorRef>jar-with-dependencies</descriptorRef>
                            </descriptorRefs>
                        </configuration>
                    </execution>
                </executions>
            </plugin>
        </plugins>
    </build>
Model
Controller를 만들기 전에 컨트롤러의 기반이 되는 model 클래스들을 작성하도록 하겠습니다. 이때 작성되는 클래스들은 Fabric8 Kubernetes Client를 사용하여 Kubernetes API 서버와의 요청 및 응답으로 사용될 POJO 클래스입니다.
아래의 코드를 보면 알 수 있듯이 간단하게 애노테이션을 이용해서 Foo CustomResourceDefinition에 Version, apiGroup, plural와 같은 정보를 제공할 수 있습니다.
Foo.java
package io.fabric8.mycontroller.api.model.v1alpha1;

import io.fabric8.kubernetes.api.model.Namespaced;
import io.fabric8.kubernetes.client.CustomResource;
import io.fabric8.kubernetes.model.annotation.Group;
import io.fabric8.kubernetes.model.annotation.Plural;
import io.fabric8.kubernetes.model.annotation.Version;

@Version("v1alpha1")
@Group("mycontroller.k8s.io")
@Plural("foos")
public class Foo extends CustomResource<FooSpec, FooStatus> implements Namespaced {
}
FooSpec.java
package io.fabric8.mycontroller.api.model.v1alpha1;

public class FooSpec {
    private String deploymentName;
    private int replicas;

    public String getDeploymentName() {
        return deploymentName;
    }

    public void setDeploymentName(String deploymentName) {
        this.deploymentName = deploymentName;
    }

    public int getReplicas() {
        return replicas;
    }

    public void setReplicas(int replicas) {
        this.replicas = replicas;
    }

    @Override
    public String toString() {
        return "FooSpec{replicas=" + replicas + "}";
    }
}
FooStatus.java
package io.fabric8.mycontroller.api.model.v1alpha1;

public class FooStatus {
    private int availableReplicas;

    public int getAvailableReplicas() {
        return availableReplicas;
    }

    public void setAvailableReplicas(int availableReplicas) {
        this.availableReplicas = availableReplicas;
    }

    @Override
    public String toString() {
        return "FooStatus{ availableReplicas=" + availableReplicas + "}";
    }
}
FooList.java
package io.fabric8.mycontroller.api.model.v1alpha1;

import io.fabric8.kubernetes.client.CustomResourceList;

public class FooList extends CustomResourceList<Foo> {
}
Main Class for initialization
이번엔 애플리케이션을 Initialization 할 MyControllerMain 클래스에 작성하도록 하겠습니다. 이 클래스엔 Kubernetes API와 상호작용 하기 위한 KubernetesClient와 Foo resource와 Deployment를 위한 SharedInformers를 생성합니다.
🤔 SharedInformers란?
Informers 또는 SharedInformers는 이벤트 기반 아키텍처로 kube-apiserver의 이벤트를 사용자 지정 코드에 의해 포착합니다.
이 이벤트의 예로는 pod 또는 node가 생성되는 일 등이 있습니다.
Main 클래스에서 모든 Initialization이 끝나면 MyController의 인스턴스를 생성하고 mycontroller.create() 코드를 통해 Foo resource와 Deployment에 대한 이벤트 핸들러를 셋업 합니다. 그리고 myController.run()을 통해서 Custom Controller를 실행합니다.
package io.fabric8.mycontroller;

import io.fabric8.kubernetes.api.model.apps.Deployment;
import io.fabric8.kubernetes.client.DefaultKubernetesClient;
import io.fabric8.kubernetes.client.KubernetesClient;
import io.fabric8.kubernetes.client.KubernetesClientException;
import io.fabric8.kubernetes.client.dsl.MixedOperation;
import io.fabric8.kubernetes.client.dsl.Resource;
import io.fabric8.kubernetes.client.informers.SharedIndexInformer;
import io.fabric8.kubernetes.client.informers.SharedInformerFactory;
import io.fabric8.mycontroller.api.model.v1alpha1.Foo;
import io.fabric8.mycontroller.api.model.v1alpha1.FooList;

/**
 * Main Class for application, you can run this sample using this command:
 *
 *  mvn exec:java -Dexec.mainClass="io.fabric8.mycontroller.MyControllerMain"
 */
public class MyControllerMain {

    public static final String DEFAULT_NAMESPACE = "default";

    public static void main(String[] args) {
        try (KubernetesClient client = new DefaultKubernetesClient()) {
            String namespace = client.getNamespace();
            if (namespace.isEmpty()) {
                namespace = DEFAULT_NAMESPACE;
            }
            SharedInformerFactory informerFactory = client.informers();

            MixedOperation<Foo, FooList, Resource<Foo>> fooClient = client.customResources(Foo.class, FooList.class);
            SharedIndexInformer<Deployment> deploymentSharedIndexInformer =
                informerFactory.sharedIndexInformerFor(Deployment.class, 10 * 60 * 1000);
            SharedIndexInformer<Foo> fooSharedIndexInformer =
                informerFactory.sharedIndexInformerForCustomResource(Foo.class,10 * 60 * 1000);

            SampleController sampleController = new SampleController(client, fooClient, deploymentSharedIndexInformer, fooSharedIndexInformer, namespace);


            sampleController.create();
            informerFactory.startAllRegisteredInformers();
            informerFactory.addSharedInformerEventListener(exception -> System.out.println("Exception occurred, but caught: " + exception));

            sampleController.run();
        } catch (KubernetesClientException exception) {
            System.out.println("Kubernetes Client Exception: " + exception);
        }
    }
}
Custom Controller class
이제 MyController 클래스를 작성해보도록 하겠습니다. 이번엔 먼저 코드를 살펴본 다음 설명을 이어가도록 하겠습니다.
package io.fabric8.mycontroller.controller;

import io.fabric8.kubernetes.api.model.HasMetadata;
import io.fabric8.kubernetes.api.model.OwnerReference;
import io.fabric8.kubernetes.api.model.apps.Deployment;
import io.fabric8.kubernetes.api.model.apps.DeploymentBuilder;
import io.fabric8.kubernetes.client.KubernetesClient;
import io.fabric8.kubernetes.client.dsl.MixedOperation;
import io.fabric8.kubernetes.client.dsl.Resource;
import io.fabric8.kubernetes.client.informers.ResourceEventHandler;
import io.fabric8.kubernetes.client.informers.SharedIndexInformer;
import io.fabric8.kubernetes.client.informers.cache.Cache;
import io.fabric8.kubernetes.client.informers.cache.Lister;
import io.fabric8.mycontroller.MyControllerMain;
import io.fabric8.mycontroller.api.model.v1alpha1.FooList;
import io.fabric8.mycontroller.api.model.v1alpha1.Foo;
import io.fabric8.mycontroller.api.model.v1alpha1.FooSpec;
import io.fabric8.mycontroller.api.model.v1alpha1.FooStatus;
import org.slf4j.Logger;
import org.slf4j.LoggerFactory;

import java.util.HashMap;
import java.util.List;
import java.util.Map;
import java.util.Objects;
import java.util.concurrent.ArrayBlockingQueue;
import java.util.concurrent.BlockingQueue;

public class MyController {
    private final BlockingQueue<String> workqueue;
    private final SharedIndexInformer<Foo> fooInformer;
    private final SharedIndexInformer<Deployment> deploymentInformer;
    private final Lister<Foo> fooLister;
    private final KubernetesClient kubernetesClient;
    private final MixedOperation<Foo, FooList, Resource<Foo>> fooClient;
    public static final Logger logger = LoggerFactory.getLogger(MyControllerMain.class.getName());

    public MyController(KubernetesClient kubernetesClient, MixedOperation<Foo, FooList, Resource<Foo>> fooClient, SharedIndexInformer<Deployment> deploymentInformer, SharedIndexInformer<Foo> fooInformer, String namespace) {
        this.kubernetesClient = kubernetesClient;
        this.fooClient = fooClient;
        this.fooLister = new Lister<>(fooInformer.getIndexer(), namespace);
        this.fooInformer = fooInformer;
        this.deploymentInformer = deploymentInformer;
        this.workqueue = new ArrayBlockingQueue<>(1024);
    }

    public void create() {
        // Set up an event handler for when Foo resources change
        fooInformer.addEventHandler(new ResourceEventHandler<Foo>() {
            @Override
            public void onAdd(Foo foo) {
                enqueueFoo(foo);
            }

            @Override
            public void onUpdate(Foo foo, Foo newFoo) {
                enqueueFoo(newFoo);
            }

            @Override
            public void onDelete(Foo foo, boolean b) {
                // Do nothing
            }
        });

        // Set up an event handler for when Deployment resources change. This
        // handler will lookup the owner of the given Deployment, and if it is
        // owned by a Foo resource will enqueue that Foo resource for
        // processing. This way, we don't need to implement custom logic for
        // handling Deployment resources. More info on this pattern:
        // https://github.com/kubernetes/community/blob/8cafef897a22026d42f5e5bb3f104febe7e29830/contributors/devel/controllers.md
        deploymentInformer.addEventHandler(new ResourceEventHandler<Deployment>() {
            @Override
            public void onAdd(Deployment deployment) {
                handleObject(deployment);
            }

            @Override
            public void onUpdate(Deployment oldDeployment, Deployment newDeployment) {
                // Periodic resync will send update events for all known Deployments.
                // Two different versions of the same Deployment will always have different RVs.
                if (oldDeployment.getMetadata().getResourceVersion().equals(newDeployment.getMetadata().getResourceVersion())) {
                    return;
                }
                handleObject(newDeployment);
            }

            @Override
            public void onDelete(Deployment deployment, boolean b) {
                handleObject(deployment);
            }
        });
    }

    public void run() {
        logger.info("Starting {} controller", Foo.class.getSimpleName());
        logger.info("Waiting for informer caches to sync");
        while (!deploymentInformer.hasSynced() || !fooInformer.hasSynced()) {
            // Wait till Informer syncs
        }

        while (!Thread.currentThread().isInterrupted()) {
            try {
                logger.info("trying to fetch item from workqueue...");
                if (workqueue.isEmpty()) {
                    logger.info("Work Queue is empty");
                }
                String key = workqueue.take();
                Objects.requireNonNull(key, "key can't be null");
                logger.info("Got {}", key);
                if (key.isEmpty() || (!key.contains("/"))) {
                    logger.warn("invalid resource key: {}", key);
                }

                // Get the Foo resource's name from key which is in format namespace/name
                String name = key.split("/")[1];
                Foo foo = fooLister.get(key.split("/")[1]);
                if (foo == null) {
                    logger.error("Foo {} in workqueue no longer exists", name);
                    return;
                }
                reconcile(foo);

            } catch (InterruptedException interruptedException) {
                Thread.currentThread().interrupt();
                logger.error("controller interrupted..");
            }
        }
    }

    /**
     * Compares the actual state with the desired, and attempts to
     * converge the two. It then updates the Status block of the Foo resource
     * with the current status of the resource.
     *
     * @param foo specified resource
     */
    protected void reconcile(Foo foo) {
        String deploymentName = foo.getSpec().getDeploymentName();
        if (deploymentName == null || deploymentName.isEmpty()) {
            // We choose to absorb the error here as the worker would requeue the
            // resource otherwise. Instead, the next time the resource is updated
            // the resource will be queued again.
            logger.warn("No Deployment name specified for Foo {}/{}", foo.getMetadata().getNamespace(), foo.getMetadata().getName());
            return;
        }

        // Get the deployment with the name specified in Foo.spec
        Deployment deployment = kubernetesClient.apps().deployments().inNamespace(foo.getMetadata().getNamespace()).withName(deploymentName).get();
        // If the resource doesn't exist, we'll create it
        if (deployment == null) {
            createDeployments(foo);
            return;
        }

        // If the Deployment is not controlled by this Foo resource, we should log
        // a warning to the event recorder and return error msg.
        if (!isControlledBy(deployment, foo)) {
            logger.warn("Deployment {} is not controlled by Foo {}", deployment.getMetadata().getName(), foo.getMetadata().getName());
            return;
        }

        // If this number of the replicas on the Foo resource is specified, and the
        // number does not equal the current desired replicas on the Deployment, we
        // should update the Deployment resource.
        if (foo.getSpec().getReplicas() != deployment.getSpec().getReplicas()) {
            logger.info("Foo {} replicas: {}, Deployment {} replicas: {}", foo.getMetadata().getName(), foo.getSpec().getReplicas(),
                deployment.getMetadata().getName(), deployment.getSpec().getReplicas());
            deployment.getSpec().setReplicas(foo.getSpec().getReplicas());
            kubernetesClient.apps().deployments()
                .inNamespace(foo.getMetadata().getNamespace())
                .withName(deployment.getMetadata().getNamespace())
                .replace(deployment);
        }

        // Finally, we update the status block of the Foo resource to reflect the
        // current state of the world
        updateAvailableReplicasInFooStatus(foo, foo.getSpec().getReplicas());
    }

    private void createDeployments(Foo foo) {
        Deployment deployment = createNewDeployment(foo);
        kubernetesClient.apps().deployments().inNamespace(foo.getMetadata().getNamespace()).create(deployment);
    }

    private void enqueueFoo(Foo foo) {
        logger.info("enqueueFoo({})", foo.getMetadata().getName());
        String key = Cache.metaNamespaceKeyFunc(foo);
        logger.info("Going to enqueue key {}", key);
        if (key != null && !key.isEmpty()) {
            logger.info("Adding item to workqueue");
            workqueue.add(key);
        }
    }

    private void handleObject(HasMetadata obj) {
        logger.info("handleDeploymentObject({})", obj.getMetadata().getName());
        OwnerReference ownerReference = getControllerOf(obj);
        Objects.requireNonNull(ownerReference);
        if (!ownerReference.getKind().equalsIgnoreCase(Foo.class.getSimpleName())) {
            return;
        }
        Foo foo = fooLister.get(ownerReference.getName());
        if (foo == null) {
            logger.info("ignoring orphaned object '{}' of foo '{}'", obj.getMetadata().getSelfLink(), ownerReference.getName());
            return;
        }
        enqueueFoo(foo);
    }

    private void updateAvailableReplicasInFooStatus(Foo foo, int replicas) {
        FooStatus fooStatus = new FooStatus();
        fooStatus.setAvailableReplicas(replicas);
        // NEVER modify objects from the store. It's a read-only, local cache.
        // You can create a copy manually and modify it
        Foo fooClone = getFooClone(foo);
        fooClone.setStatus(fooStatus);
        // If the CustomResourceSubresources feature gate is not enabled,
        // we must use Update instead of UpdateStatus to update the Status block of the Foo resource.
        // UpdateStatus will not allow changes to the Spec of the resource,
        // which is ideal for ensuring nothing other than resource status has been updated.
        fooClient.inNamespace(foo.getMetadata().getNamespace()).withName(foo.getMetadata().getName()).updateStatus(foo);
    }

    /**
     * createNewDeployment creates a new Deployment for a Foo resource. It also sets
     * the appropriate OwnerReferences on the resource so handleObject can discover
     * the Foo resource that 'owns' it.
     * @param foo {@link Foo} resource which will be owner of this Deployment
     * @return Deployment object based on this Foo resource
     */
    private Deployment createNewDeployment(Foo foo) {
        return new DeploymentBuilder()
            .withNewMetadata()
            .withName(foo.getSpec().getDeploymentName())
            .withNamespace(foo.getMetadata().getNamespace())
            .withLabels(getDeploymentLabels(foo))
            .addNewOwnerReference().withController(true).withKind(foo.getKind()).withApiVersion(foo.getApiVersion()).withName(foo.getMetadata().getName()).withNewUid(foo.getMetadata().getUid()).endOwnerReference()
            .endMetadata()
            .withNewSpec()
            .withReplicas(foo.getSpec().getReplicas())
            .withNewSelector()
            .withMatchLabels(getDeploymentLabels(foo))
            .endSelector()
            .withNewTemplate()
            .withNewMetadata().withLabels(getDeploymentLabels(foo)).endMetadata()
            .withNewSpec()
            .addNewContainer()
            .withName("nginx")
            .withImage("nginx:latest")
            .endContainer()
            .endSpec()
            .endTemplate()
            .endSpec()
            .build();
    }

    private Map<String, String> getDeploymentLabels(Foo foo) {
        Map<String, String> labels = new HashMap<>();
        labels.put("app", "nginx");
        labels.put("controller", foo.getMetadata().getName());
        return labels;
    }

    private OwnerReference getControllerOf(HasMetadata obj) {
        List<OwnerReference> ownerReferences = obj.getMetadata().getOwnerReferences();
        for (OwnerReference ownerReference : ownerReferences) {
            if (ownerReference.getController().equals(Boolean.TRUE)) {
                return ownerReference;
            }
        }
        return null;
    }

    private boolean isControlledBy(HasMetadata obj, Foo foo) {
        OwnerReference ownerReference = getControllerOf(obj);
        if (ownerReference != null) {
            return ownerReference.getKind().equals(foo.getKind()) && ownerReference.getName().equals(foo.getMetadata().getName());
        }
        return false;
    }

    private Foo getFooClone(Foo foo) {
        Foo cloneFoo = new Foo();
        FooSpec cloneFooSpec = new FooSpec();
        cloneFooSpec.setDeploymentName(foo.getSpec().getDeploymentName());
        cloneFooSpec.setReplicas(foo.getSpec().getReplicas());

        cloneFoo.setSpec(cloneFooSpec);
        cloneFoo.setMetadata(foo.getMetadata());

        return cloneFoo;
    }
}
create()
포스팅 첫 부분에서 언급했듯 Controller에는 workQueue가 있습니다. 이 큐에는 컨트롤러가 처리해야 하는 ADD, UPDATE, DELETE와 같은 다양한 이벤트들이 대기열을 이루고 있게 됩니다. 이때 큐 대기열을 채우는 게 SharedIndexInformer 이벤트 핸들러입니다.
create() 메서드에선 이 이벤트 핸들러를 셋업합니다.
run()
run 메서드는 Thread가 멈추지 않는 한 무한루프로 실행되면서 workQueue 안에 item이 있는지 체크하는 메서드입니다.
만약 item이 존재한다면 item에 해당하는 Foo resource를 가져오게 됩니다. 이때 item이 유효하다고 생각이 되면 reconile() 메서드를 실행합니다.
reconcile()
reconcile은 이 포스팅 처음에도 언급했지만 컨트롤러의 핵심 로직 메서드입니다.
- Deployment의 이름이 비어있거나 null이 아닌지 체크합니다.
- Kubernetes API Server에서 이름이 일치하는 Deployment를 가져옵니다. 이때 만약 일치하는 Deployment가 존재하지 않으면 createDeployment() 메서드를 호출해서 새로운 Deployment를 생성합니다.
- Kubernetes API Server에서 받은 Deployment가 실제로 Foo 리소스에 있는지 확인합니다. 만약 없다면 경고를 보냅니다.
- Kubernetes API Server에서 받은 Deployment의 replicas의 수와 foo.getSpec().getReplicas()의 수가 동일한지 확인합니다. 만약 동일하지 않다면 Foo에 설정한 replicas의 수와 동일하도록 업데이트합니다.
- 모든 작업이 완료되었다면 Foo resource의 .status 필드에 현재 상태를 업데이트합니다.
설명한 것들 이외의 메서드는 child Deployment를 만드는 것과 Foo 상태를 업데이트하는 등과 같은 helper 메서드입니다.
Running
이제 Custom Controller와 관련된 코드를 모드 작성했습니다. 마지막으로 resource 디렉토리 하위에 CRD를 생성하는 템플릿과 예시로 사용할 템플릿을 추가하도록 하겠습니다.
crd.yaml
apiVersion: apiextensions.k8s.io/v1beta1
kind: CustomResourceDefinition
metadata:
  name: foos.mycontroller.k8s.io
spec:
  group: mycontroller.k8s.io
  version: v1alpha1
  names:
    kind: Foo
    plural: foos
  scope: Namespaced
  subresources:
    status: {}
example-foo.yaml
apiVersion: mycontroller.k8s.io/v1alpha1
kind: Foo
metadata:
  name: example-foo
spec:
  deploymentName: example-foo-deploy
  replicas: 1
이제 실제로 Custom Controller를 실행시켜 보도록 하겠습니다. 아래의 명령어로 프로젝트를 compile 하도록 하겠습니다.
mvn clean install그런 다음 간단한 테스트 환경을 구축하기 위해 minikube를 install 하도록 하겠습니다. 아래의 명령어로 간단하게 minikube를 설치할 수 있습니다.(MacOS 기준)
brew install minikubeminikube가 설치되면 minikube를 실행시켜줍니다.
minikube start
자, 이제 test 할 환경까지 갖추어졌으니 먼저 Kubernetes Cluster에 CRD를 배포하도록 하겠습니다.
kubectl create -f src/main/resources/crd.yaml
CRD가 생성된 것을 확인했으면 아래의 명령어로 Custom Controller를 실행시켜봅니다.
그럼
java -jar target/mycontroller-1.0.0-SNAPSHOT-jar-with-dependencies.jarCustom Controller를 실행시키면 잠시 후 Work Queue가 비어져 있다는 log를 확인할 수 있습니다.

이번엔 터미널 창을 하나 더 열어서 아래의 명령어로 Custom Resource인 Foo를 배포해보도록 하겠습니다.
kubectl create -f src/main/resources/example-foo.yml Foo가 배포되고 나면 Custom Controller의 work queue로 item이 들어오고 controller가 이를 처리하는 것을 확인할 수 있습니다.

여기까지 Custom controller를 생성하고 실행하는 방법에 대해 알아봤습니다. 이 포스팅은 아래의 링크들의 자료를 보며 현재 kubernetes client 버전에 맞게 수정하며 공부한 내용을 정리한 포스팅입니다. 좀 더 자세한 내용은 아래의 링크를 통해 확인하실 수 있습니다.
또한 해당 포스팅에서 사용된 모든 코드는 github에 올려뒀습니다. :)
ooeunz/blog-code
Contribute to ooeunz/blog-code development by creating an account on GitHub.
github.com
if(kakao)2020
오늘도 카카오는 일상을 바꾸는 중
if.kakao.com
Writing Kubernetes Sample Controller in Java
I recently saw this Sample Controller repository on kubernetes Github repository. This just implements a simple controller for watching…
itnext.io
'DevOps > Kubernetes' 카테고리의 다른 글
| [DevOps] Istio: Circuit Breaker를 지원하는 Service Mesh의 구현체 (0) | 2020.11.16 |
|---|---|
| [Kubernetes] Helm: template package managing tool (0) | 2020.07.22 |
| [Kubernetes] ConfigMap / Secret: config 정보를 container 외부에서 가져오기 (0) | 2020.07.22 |
| [Kubernetes] Volume: k8s에서 데이터를 Disk에 영구 저장하기 (0) | 2020.07.20 |
| [Kubernetes] Rolling Update (Deployment): 무중단 배포 (6) | 2020.07.17 |